

In the previous post, we talked about [Değerli Ziyaretci, linki görmeniz icin bu mesaja cevap yazmanız gerekiyorÜye olmak icin burayı tıklayınız]and we saw some useful examples used to troubleshoot your network, today we will talk about some Linux security commands that you will need to harden your system. New vulnerabilities are discovered a lot these days, exploits are immediately built on those vulnerabilities after being discovered. Maybe you are updating your system periodically, but this is not enough, you need to harden your system to protect your assets as much as possible. You can secure your console by limiting the root to use particular terminals. You can do this by specifying the terminals that the root will use in /etc/securetty file. Its preferred but not required to allow root login from one terminal only and leave other terminals for other users.
Change Your Password Always
Strong password is a must these days, but to add another layer of security, you should change your password from time to time.
You may forget to change it yourself, so there must be something that reminds you about your password age and when to modify it.
There are two ways to achieve that, the first way is by command line using the change command like this:
- Using chage command.
- Set defaults in /etc/login.defs.
$ chage -M 20 likegeeks
We use the -M option is used to set the expiration days for your password.
You can type chage without options and it will ask you about the value.
$ chage likegeeks
Or you can set your default rules in /etc/login.defs file.
You can change these values according to your needs.
PASS_MAX_DAYS 10
PASS_MIN_DAYS 0
PASS_WARN_AGE 3
Keep in mind that, you should force users to use strong password using pam_cracklib.
Once youve installed it, you can go to /etc/pam.d/system-auth and type something like this:
password required pam_cracklib.so minlen=12 lcredit=-1 ucredit=-1 dcredit=-2 ocredit=-1
sudo Notification
sudo command makes life easier and also can lead to Linux Security issues that can ruin your life.
All sudo configurations in the /etc/sudoers file.
You can prevent users from running the commands you want as root.
You can make sudo send an email when it is used by adding the following line to the file:
mailto [Değerli Ziyaretci, linki görmeniz icin bu mesaja cevap yazmanız gerekiyorÜye olmak icin burayı tıklayınız]
And set mail_always to on.
mail_always on
Securing SSH
If we will talk about Linux security, we need to talk about SSH service. SSH is an important service to your system, it enables you to connect easily to your system, and sometimes it is the only way to make your system survive when things go bad, so tuning SSH is a must.
Since we use CentOS 7 in our posts, so the SSH configuration file is in:
/etc/ssh/sshd_config
The scanners or bots that the attackers use try to connect to SSH on port 22 which is the default.
It is common to change your SSH port to another unused port, lets say 5555. You can change the SSH port by typing the Port number in the configuration file like this:
Port 5555
You can also restrict the root login by updating the value of PermitRootLogin to no:
PermitRootLogin no
And surely disable tunneled clear passwords and use public-private key login instead:
PasswordAuthentication no
PermitEmptyPasswords no
Regarding SSH timeouts. This traditional problem can be handled by configuring the following settings.
For example, the following settings imply that a packet will be sent every 60 seconds:
ServerAliveInterval 15
ServerAliveCountMax 3
TCPKeepAlive yes
By adjusting these values, you can provide a longer connection:
ClientAliveInterval 30
ClientAliveCountMax 5
You can specify the allowed users for using SSH service:
AllowUsers user1 user2
Or you can make it per group:
AllowGroup group1 group2
Securing SSH Using Google Authenticator
Further to this, you can use two-factor authentication for SSH like google authenticator.
$ yum install google-authenticator
Then run it to verify the installation.
$ google-authenticator
You should have Google authenticator application installed on your Mobile phone.
Edit /etc/pam.d/sshd file and add this:
auth required pam_google_authenticator.so
And the last thing to do is to tell SSH about this by adding the following line to /etc/ssh/sshd_config
ChallengeResponseAuthentication yes
Now restart you SSH.
$ systemctl restart sshd
And when you log in using SSH, it will ask about verification code, so your SSH is secured and more solid now.
Intrusion Detection with Tripwire (Monitoring Filesystem)
Tripwire is one of the great tools in Linux security. Its an intrusion detection system (HIDS).
Tripwire job is to monitor the filesystem, who changed the files, and when that change happened.
In order to get tripwire, you need access to EPEL repository. You can add it easily:
wget [Değerli Ziyaretci, linki görmeniz icin bu mesaja cevap yazmanız gerekiyorÜye olmak icin burayı tıklayınız]
$ rpm -ivh epel-release-7-9.noarch.rpm
Once youve installed EPEL repo, you can install tripwire.
$ sudo yum install tripwire
First, create keyfiles like this:
$ tripwire-setup-keyfiles
It will prompt you to enter a passphrase for keyfiles. Tripwire will tell you to use a strong password.
Now you can customize Tripwire by making changes to this file:
/etc/tripwire/twpol.txt
This file is very easy to read and modify since every line has a comment that describes it well.
When Tripwire is completed, you should initialize it like this:
$ tripwire --init
It will take some time scanning the system depends on your file sizes.
Any modifications to the filesystem are considered to be system intrusion, the administrator will be notified and he will need to restore the system with files that can be trusted.
For this reason, any system changes should be validated through Tripwire. To do this, use the following command:
$ tripwire --check
One last thing about tripwire, I would recommend that you secure both the twpol.txt and twcfg.txt files as another step of security.
Tripwire has a lot of options and settings; you can check them with man tripwire
Using Firewalld
Firewalld is a replacement for iptables, it improves the management of Linux security. Firewalld can enable configuration changes without stopping the current connections.
Firewalld runs as a service that allows for rules to be added and changed immediately and it uses network zones.
To know if Firewalld is currently running or not, type this command:
$ firewall-cmd --state
You can list the predefined zones like this:
$ firewall-cmd --get-zones
Each zone of these has a trust level.
The value can be updated like this:
$ firewall-cmd --set-default-zone=
You can get all the relevant information about any particular zone like this:
$ firewall-cmd --zone= --list-all
You can list all supported services like this:
$ firewall-cmd --get-services
Then you can add additional services or remove them within a zone:
$ firewall-cmd --zone= --add-service=
$ firewall-cmd --zone= --remove-service=
You can list all ports open in any particular zone:
$ firewall-cmd --zone= --list-ports
You can add ports to a zone like this:
$ firewall-cmd --zone= --add-port=<port-number/protocol>
$ firewall-cmd --zone= --remove-port=<port-number/protocol>
You can add or remove port forwarding like this:
$ firewall-cmd --zone= --add-forward-port=
$ firewall-cmd --zone= --remove-forward-port=
Firewalld is very comprehensive and the best thing about Firewalld is that you can manage firewall architecture without restarting or stopping service unlike iptables, where you should reload or restart the service.
Returning to Iptables
Some people prefer [Değerli Ziyaretci, linki görmeniz icin bu mesaja cevap yazmanız gerekiyorÜye olmak icin burayı tıklayınız] over Firewalld, you can return to iptables easily.
First, disable Firewalld:
$ systemctl disable firewalld
$ systemctl stop firewalld
Then install iptables:
$ yum install iptables-services
$ touch /etc/sysconfig/iptables
$ touch /etc/sysconfig/ip6tables
Now you can start iptables service:
$ systemctl start iptables
$ systemctl start ip6tables
$ systemctl enable iptables
$ systemctl enable ip6tables
Finally, reboot your system.
Restricting the Compilers
The attacker might compile the exploits on his machine and upload it to the victim server without the need to the compilers, but anyway, its preferable to restrict the compilers if you dont use them in production as most modern hosting panels do.
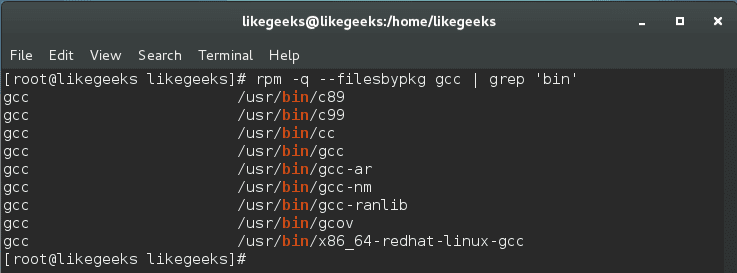
First, get a list of all binaries from packages, then set the permission for them.
$ rpm -q --filesbypkg gcc | grep 'bin'
Create a new group:
$ groupadd compilerGroup
Then change the group of the compiler binaries like this:
$ chown root:compilerGroup /usr/bin/gcc
And one last important thing is to change the permission of this binary to be only the compilers group.
$ chmod 0750 /usr/bin/gcc
Now, any user tries to use gcc will see permission denied message.
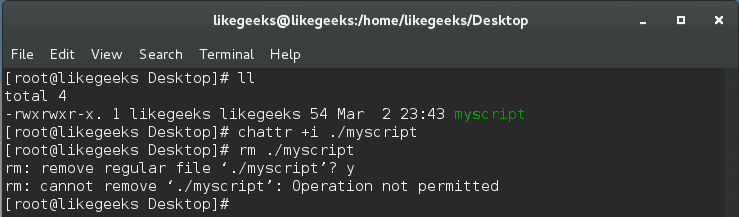
Awesome Immutable Files (Prevent File Modification)
Immutable files cannot be overwritten by any user, even root. He cant modify it or delete it unless he removes the immutable bit from it and root user only can do this.
You can say that this feature protects you as root from any mistakes that can damage or harm your system. Awesome!!
You can protect configuration files or any file you want.
To make any file immutable, use the chattr command.
$ chattr +i /myscript
You can remove immutable attribute like this:
$ chattr -i /myscript
You can protect any files in your system the same way, but keep in mind that, if you do this to the system binaries, you cant update them unless you remove the immutable bit.
I will leave the rest of the examples about using immutable files to your imagination.
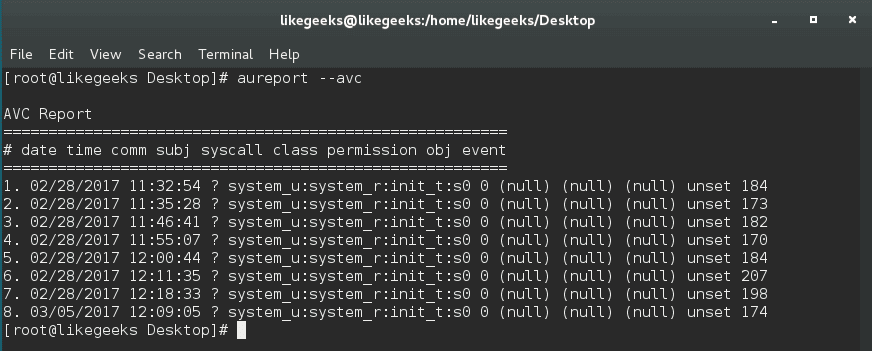
Managing SELinux with aureport
It is a common thing if you are using hosting control panels, you will find SELinux disabled.
Disabling SELinux will leave the system exposed. I agree, but SELinux has some complexity, but you can make your life easier if you manage it using aureport.
The aureport utility is developed to create tabular reports for audit [Değerli Ziyaretci, linki görmeniz icin bu mesaja cevap yazmanız gerekiyorÜye olmak icin burayı tıklayınız].
$ aureport --avc
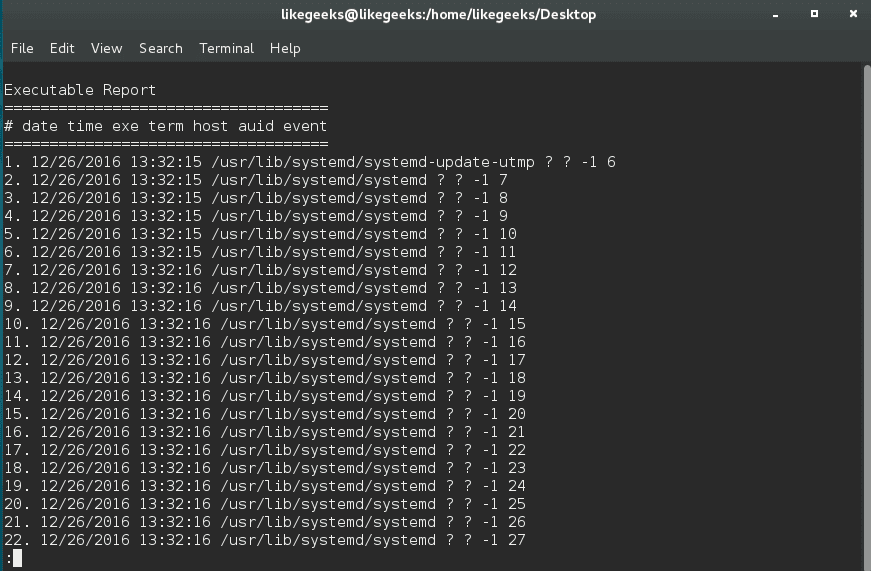
You can create a list of executable files like this:
$ aureport -x
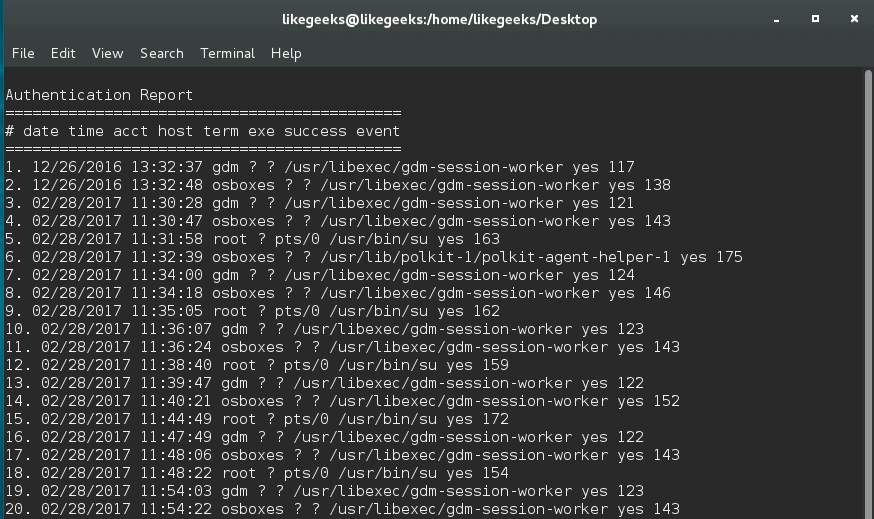
You can use aureport to generate a full authentication report.
$ aureport -au -i
Or you can list the failed authentication events.
$ aureport -au --summary -i --failed
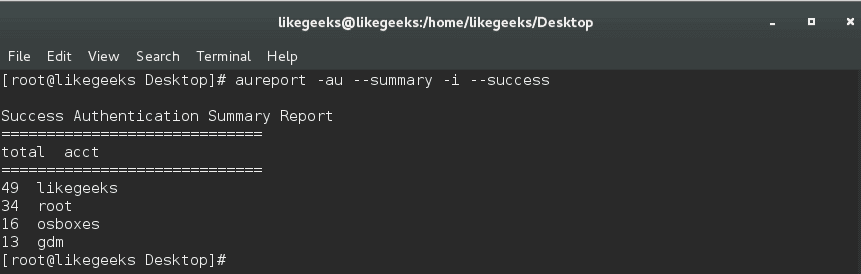
Or maybe a summary of successful authentication events.
Awesome!!
aureport tool makes working with SELinux pretty easy.
Using sealert Tool
In addition to aureport tool, you can use a good Linux security tool called sealert, you can install it with this command:
$ yum install setools
Now we have a tool that will actively return announcements from /var/log/audit/audit.log file and gives us something readable about SELinux problems.
You can use it like this:
$ sealert -a /var/log/audit/audit.log
The best thing about the generated report is at the end of each alert if found, you will find how to resolve the problem.
In this post weve covered just some of the Linux security tricks that can help you harden your system, However, there are a lot of Linux security tricks for many running services that need hardening.
I hope you found the post useful and interesting.
Thank you.
[Değerli Ziyaretci, linki görmeniz icin bu mesaja cevap yazmanız gerekiyorÜye olmak icin burayı tıklayınız]
turk-dreamworld.com Sitesine Hoşgeldiniz.
1 sonuçtan 1 ile 1 arası
-
29.11.2017, 12:28 #1TDW Team-S-Mod.


")
- Üyelik tarihi
- Dec 2016
- Mesajlar
- 38.382
 :
:
0 Bu Konu icin
2.979 Toplam Useful Linux Security Tricks to Harden Your System


 Alıntı
Benzer Konular
-
What is Linux File System? Easy Guide
Von usta_399 im Forum Linux & Unix SistemleriCevaplar: 0Son Mesaj: 11.11.2017, 01:02 -
SD Maid Pro System Reinigung - System Cleaning Tool
Von kocahaydar im Forum Android Programlar - AppsCevaplar: 0Son Mesaj: 1.07.2013, 17:13 -
SPB Pocket PC Tips & Tricks 1.5
Von d-king im Forum PDA, PNA ProgramlarCevaplar: 1Son Mesaj: 25.07.2009, 22:57 -
best soccer tricks
Von Web Master im Forum Diğer Spor DallarıCevaplar: 0Son Mesaj: 24.11.2008, 02:17
 Yetkileriniz
Bu sistem vBulletin® alt yapısına sahiptir, Version 4.2.5 kullanılmaktadır.
Telif hakları, Jelsoft Enterprises Ltd'e aittir. Copyright © 2024
Telif hakları, Jelsoft Enterprises Ltd'e aittir. Copyright © 2024
Image resizer by SevenSkins
Tüm Zamanlar GMT +2 Olarak Ayarlanmış. Şuanki Zaman: 08:51.
vBulletin 4.0 skin by CompleteVB

Paylaş